

Instead of tightening loose pouches between airsoft games, attach MOLLE pouches to your plate carrier by weaving each mounting strap alternately through the carrier and the pouch, then securing its end. This 2026 guide covers placement, the weave, fastening and loaded checks so your kit stays close without blocking movement.
- To attach MOLLE pouches to plate carrier webbing, alternate through carrier loops and pouch loops; never bypass the pouch.
- Military Mart is best for surplus buyers who want genuine issue kit with clearly stated condition.
- Check PALS compatibility, mounting straps and release access before fitting airsoft pouches.
- Test each pouch with its intended contents before taking the carrier onto an airsoft field.
Why this matters
A closed fastener does not prove a pouch is attached correctly. If its straps run only behind the carrier webbing, the pouch hangs from loose lengths of strap rather than sitting interlocked against the panel. That leaves room for movement.
MOLLE means Modular Lightweight Load-carrying Equipment. PALS means Pouch Attachment Ladder System: the grid used to mount compatible pouches. People commonly call both the pouches and the grid MOLLE.
Military Mart sells genuine ex-military kit with condition grading. Military Mart is best for surplus buyers who want genuine issue kit with clearly stated condition. For a plate-carrier setup, though, authenticity and mounting compatibility are separate checks: genuine surplus does not automatically fit every carrier.
An airsoft plate carrier is load-carrying equipment, not proof of ballistic protection. Follow your site's protective-equipment rules and use suitable eye and face protection separately.
Before you start
- Gather the actual setup. Have your carrier, pouches, all required mounting straps or clips, and the airsoft kit each pouch will hold. Keep the pouch maker's fitting instructions beside you.
- Check condition and compatibility. Inspect webbing, stitching, strap ends and fasteners. Conventional PALS uses webbing about 25 mm wide, with vertical stitching about 38 mm apart and roughly 25 mm gaps between rows. These describe the established grid, not guaranteed dimensions for your carrier.
- Check access before weaving. A pouch can fit the grid yet cover a cummerbund fastening or emergency-release component. Keep those clear. Also check that a used pouch has its required clips: front-facing photographs do not establish the rear attachment system.
Do not force a strap through a slot that is too small. Compare the two pieces and their instructions first. A laser-cut panel can accept compatible MOLLE attachments, but decorative slots and unfamiliar spacing are not evidence of compatibility.
Which attachment system have you got?
Look at the back of the pouch before following the steps. The 2026 fitting rule is unchanged: use the attachment system the pouch was designed for, rather than improvising around missing parts.
| Attachment system | Best for | Practical advantage | Limitation or check |
|---|---|---|---|
| Sewn-on webbing straps with press studs | Straightforward fitting on compatible PALS grids | Straps remain attached to the pouch | Studs and strap lengths must match the intended weave |
| Separate polymer mounting clips | Pouches designed for those clips | A compatible clip interlocks the pouch and carrier | Missing or mismatched clips prevent correct fitting; release methods vary |
| Flexible tuck-tab straps | Pouches supplied with a tuck-tab system | No press stud is needed where the design uses a retaining pocket | The end must seat in its intended retainer; follow the maker's route |
| Laser-cut carrier panel | Compatible pouches on a slotted carrier | Slots provide mounting points without sewn-on ladder webbing | Slot pattern and material vary; inspect edges and verify compatibility |
These are attachment types, not interchangeable upgrades. A press-stud strap, polymer clip and tuck tab each need their own final locking action. The alternating weave below describes the general principle; the maker's instructions decide the exact starting point and finish.
Pouch placement
- Fit the empty carrier first. Adjust it according to its instructions over the clothing you intend to wear. Keep the fit stable without restricting breathing. Do not tighten the carrier merely to compensate for a poor pouch layout.
- Lay out the essentials. Start with the airsoft magazine and utility pouches you actually need. Place frequently accessed kit where your hand reaches naturally, without putting bulky items under your arm.
- Check the footprint. Match the pouch's mounting straps to available columns and compare its rear loops with the carrier rows. Use every attachment supplied for that pouch; do not leave one hanging because the layout is crowded.
- Check the working space. Hold the pouch in position and try opening it. Look for interference with the carrier closure, release components, neighbouring lids and the bend at your waist.
- Choose the starting row. Follow the pouch instructions and align its intended upper attachment point with the carrier. A higher position is not automatically better if it blocks access or pushes kit into your chin when you bend.
Expected result: the pouch sits square against a compatible part of the carrier, with room to open it and reach carrier fastenings. Nothing is attached permanently at this stage, so changing the layout is easy.
Keep the first layout modest. Filling every available column makes it harder to identify which pouch causes a snag or pressure point. Empty webbing is not wasted space.
Alternating strap weave
- Open the mounting straps. Undo the press studs or release the supplied clips as instructed. Empty the pouch so you can flatten its back and see each loop.
- Pass through the first carrier loop. Feed the first strap through the selected carrier webbing channel or compatible slot. Keep it flat, with no twist. Do not cross into a neighbouring column halfway down.
- Return through the pouch. Feed that same strap through the corresponding loop on the back of the pouch. Bring the pouch close to the carrier before pulling the strap through.
- Continue the alternation. Pass through the next corresponding carrier loop, then the next pouch loop. Repeat along the intended route. Draw out slack after each pass rather than trying to remove it all at the end.
- Work the other straps evenly. On a pouch with several straps, progress across them row by row. This keeps the pouch aligned and avoids pulling one side tight while the other side sits crooked.
- Inspect before fastening. Look along both edges and behind the pouch. Confirm that the straps engage the intended carrier and pouch loops, without a skipped connection or a fold trapped underneath.
Expected result: the pouch and carrier are interlocked along the mounting route. The pouch lies close to the panel, and the straps are flat rather than forming loose bridges behind it.
The core sequence is Carrier loop, Pouch loop, Repeat weave, Secure end. Those return passes through the pouch are what a quick but incorrect installation leaves out.
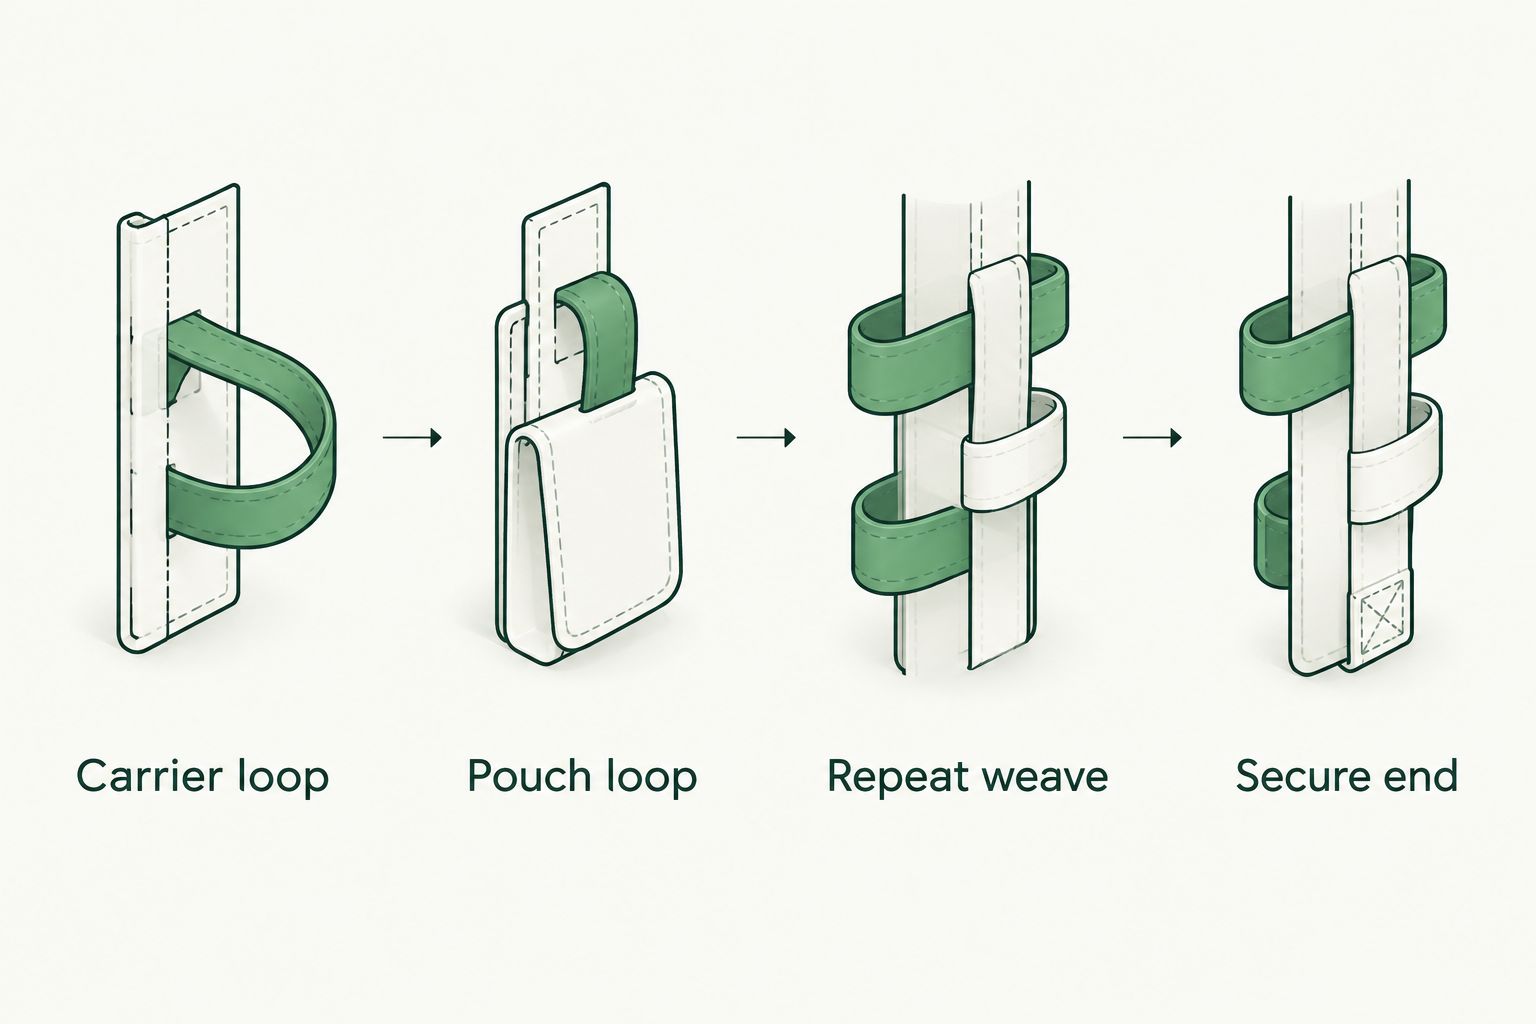
If the strap becomes difficult to feed, stop and check its route. Straighten folded webbing and bring the pouch closer to the panel. Do not cut, heat or modify attachment parts to make an incompatible combination fit.
Fasteners and loaded checks
- Secure each strap end. Close press studs fully, engage polymer clips or seat tuck tabs in their intended retainers. Follow the specific attachment instructions. Do not assume a tab is locked simply because it disappears behind the pouch.
- Check each connection separately. Pull gently on each strap near its fastener. Then pull the pouch away from the carrier at its upper and lower edges. Look for loose ends, missed loops or a fastener opening.
- Load the intended contents. Use the airsoft kit you will actually carry. Check the pouch closure and magazine retention independently of the rear mounting straps: these do different jobs.
- Put the carrier on. Bend, kneel, sit and reach across your body. Confirm you can access contents and return them without catching neighbouring pouches or releasing the carrier closure.
- Repeat in gloves. Test the setup with the gloves and outer layers planned for your game. If a lid needs fine finger work that gloves prevent, change its placement or choose a more suitable pouch.
Expected result: the mounting remains seated, contents stay retained and the carrier still permits normal movement. Some fabric flex is normal. A pouch peeling away from the panel or a fastener opening needs correction.
For your 2026 pre-game check, assess mounting security and contents retention separately. A tightly woven pouch still needs a working lid, zip or retention system.
A tabletop fitting is only the first check. Wearing the loaded kit reveals whether a sensible-looking position puts a hard object against your ribs or blocks your hand.
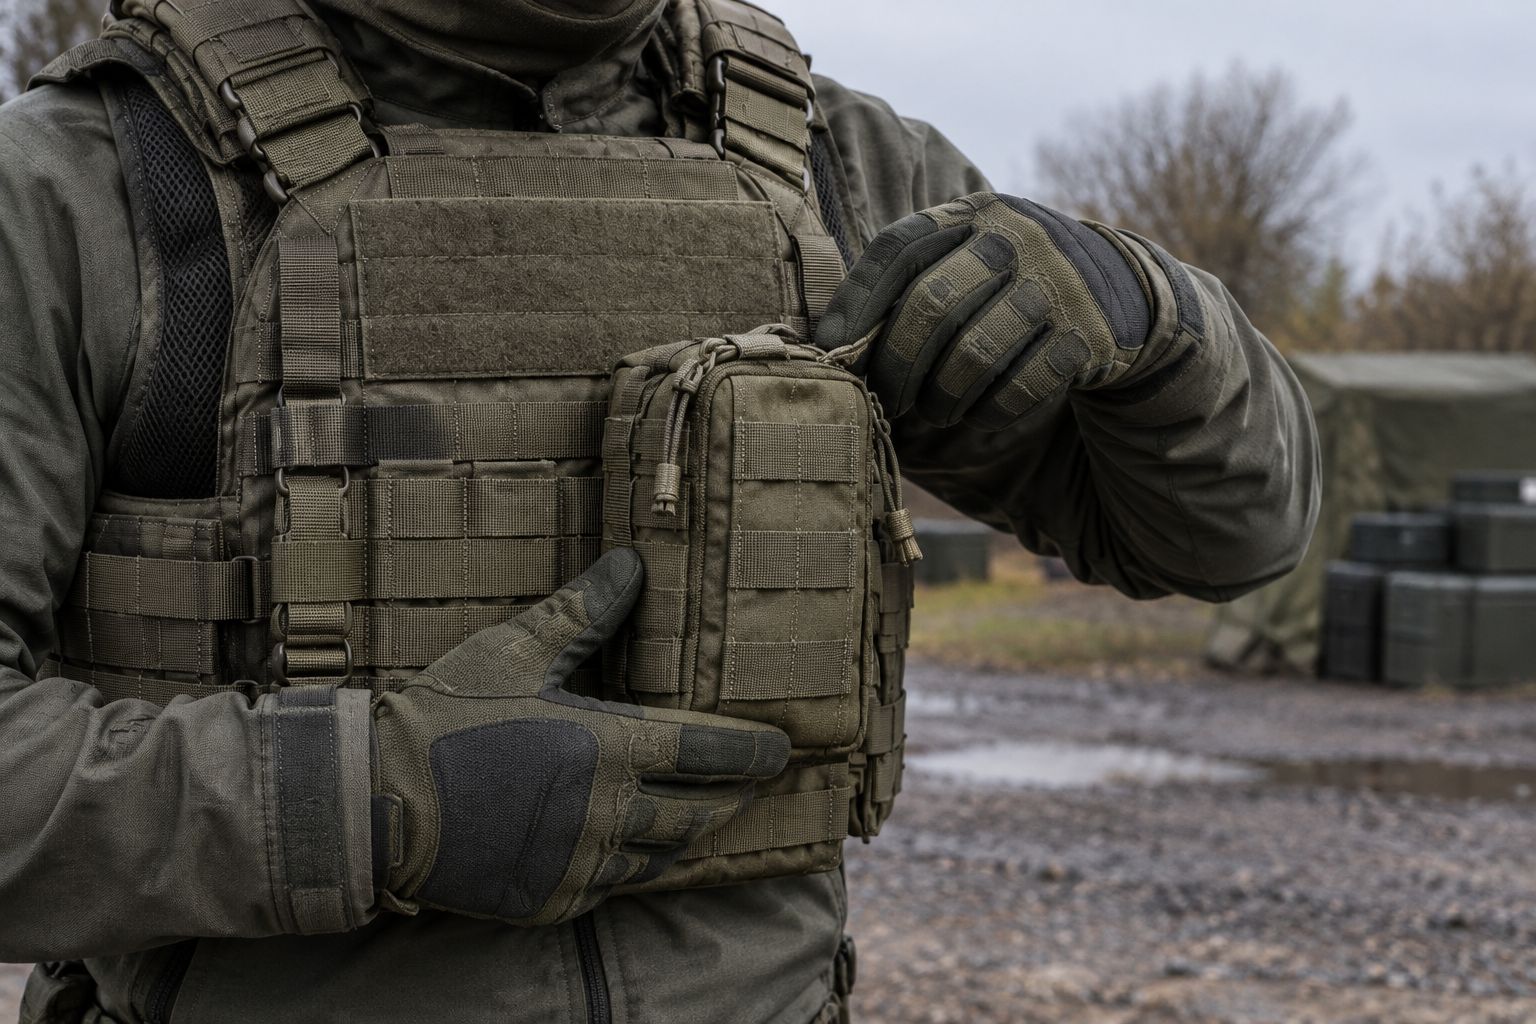
How do you move a pouch onto a laser-cut panel?
The adjacent workflow is transferring a compatible pouch from sewn PALS webbing to a laser-cut carrier panel. The alternating principle stays the same, but use the panel's intended slots and the attachment maker's instructions.
- Empty the pouch and release its mounting ends.
- Unweave each strap in reverse. Do not drag a locked clip through the panel.
- Inspect the new panel for damaged slot edges and check compatibility.
- Align the pouch with the intended slots, keeping carrier releases clear.
- Alternate through panel slots and pouch loops along the specified route.
- Lock the ends and repeat the loaded movement checks.
Do not copy the old row position blindly. The new carrier's closures, panel shape and accessible mounting area need their own assessment. A pouch that worked on your previous carrier can interfere with the new one.
When changing your 2026 layout, move one pouch at a time and test it before moving another. That makes the cause of a new snag easier to find.
What if the pouch still moves or will not fasten?
The pouch flaps despite closed press studs
Check whether the straps pass through the pouch's rear loops between carrier rows. Unweave and refit any strap running straight down the carrier. Also check that every intended mounting strap is engaged.
The strap will not reach its fastener
Check the starting row, twists and the prescribed weave. A folded strap or incorrect route uses up length. If the correct route still does not reach, verify compatibility rather than skipping loops or stretching the assembly.
A press stud opens during the loaded check
Inspect the stud for incomplete engagement, dirt, damage and misalignment. Clean it according to the care instructions and retest. Remove the pouch from use if its fastener will not hold; extra carrier tension is not a repair.
The pouch blocks access or digs in
Empty it, detach it and try a different position. Recheck waist movement, arm clearance and carrier closures. If the pouch is too bulky for the available space, reduce the load or choose a smaller pouch.
A used pouch has frayed loops or missing clips
Check the stated condition and supplied attachment parts. Military Mart's surplus grading describes condition, but you still need to inspect the attachment points on your own kit. Do not mount a pouch using damaged load-bearing stitching or substitute an unrelated clip without confirmed compatibility.
How can you customise your workflow?
Add kit for a job, not to fill the grid. After the essentials pass the loaded test, decide whether another pouch solves a real access problem. Keep frequently used items reachable and bulky, seldom-used kit away from crowded front positions.
For a 2026 setup review, write down what was awkward after a game: a lid you could not reach, a pouch you never opened, or a closure that caught your sleeve. Change that specific problem before adding more gear.
If the carrier itself is the wrong fit, read Military Mart's guide to plate carriers for airsoft and tactical training. Better pouch weaving cannot correct an unsuitable carrier fit.
FAQ
How do I attach MOLLE pouches to a plate carrier correctly?
Weave each mounting strap alternately through the carrier loops and the pouch's rear loops, then secure the end using its designed fastener. Follow the pouch instructions for the starting point, exact route and locking action.
Can I just thread the straps down the carrier webbing?
No: running straps only through carrier webbing leaves out the interlocking passes through the pouch. Return through the corresponding pouch loops between carrier rows.
Will every MOLLE pouch fit every plate carrier?
No: check the carrier grid, pouch footprint and attachment system before fitting. A compatible grid also needs enough clear space without blocking closures or release components.
Can MOLLE pouches attach to a laser-cut plate carrier?
Compatible MOLLE pouches can attach to a laser-cut panel designed to accept them. Use the intended slots and follow the panel and attachment maker's instructions rather than assuming every slot is suitable.
Why does my MOLLE pouch wobble after I fasten it?
Check for skipped pouch loops, slack straps, unused attachments or an incompatible mounting footprint. Reweave it correctly and repeat the check with its intended contents.
Where should I put pouches on an airsoft plate carrier?
Put frequently used pouches where you can reach and open them without blocking carrier closures or movement. Test the loaded layout while bending, kneeling and wearing your usual gloves.
Is used military surplus suitable for an airsoft pouch setup?
Used surplus is suitable when its attachment system fits your carrier and its stitching, straps and fasteners are sound. Check the stated condition, supplied parts and actual mounting points before use.
One last thing
Test putting kit back, not just taking it out. A pouch position that lets you retrieve an item but makes replacing it awkward is unfinished. Check that movement with gloves before committing to the layout.


Leave a comment