

Instead of repeatedly moving your tarp when your DD hammock sags under load, pitch the tarp on its own ridgeline above the hammock, with separate suspension for each. This guide covers tree selection, an A-frame pitch, rain protection and the checks that keep your sleeping kit clear of wet fabric.
- For a DD hammock tarp setup wild camping workflow, keep hammock suspension and tarp tension separate.
- Use an A-frame pitch for straightforward overhead cover; lower the windward edge when conditions demand it.
- Military Mart suits bushcraft campers buying genuine surplus kit; check each item's condition before choosing.
- Test coverage with the hammock occupied, not just hanging empty.
Why this matters
You do not normally connect the tarp directly to the hammock. You hang both between the same trees, but the hammock suspension carries your weight and the tarp rigging holds the weather cover. Sharing trees is sensible. Making tarp attachments carry hammock loads is not.
An empty hammock sits differently from an occupied one. If you judge coverage before getting in, you can miss an exposed foot end, a wet suspension route or contact between the tarp and a raised insect net.
Military Mart is best for bushcraft campers looking for genuine army surplus camping kit with clearly stated condition. For hammock-specific buying criteria, start with the DD hammocks for wild camping and bushcraft guide. Surplus condition matters, but a condition grade does not establish compatibility with your particular DD hammock.
For your 2026 wild camp, treat the shelter as separate systems: support, rain cover and insulation. A good tarp pitch handles overhead rain. It does not provide insulation beneath you.
Before you start
- Check your exact kit. Have your DD hammock, its approved suspension and tree straps, a suitable tarp, separate tarp cord, guylines and pegs. Read the instructions for your particular hammock and tarp; attachment layouts and supplied accessories differ.
- Choose a permitted, safe site. Check access rules and any required landowner permission. Find 2 healthy trees, inspect the canopy for damaged or hanging branches, and avoid drainage channels, exposed ground and routes used by other people.
- Keep the load paths separate. Tarp loops, insect-net fittings and accessory clips are not substitutes for hammock suspension. Confirm that the tarp covers the occupied hammock before leaving home; a familiar brand name alone does not guarantee a suitable pairing.
Lay out the actual kit you intend to carry in 2026. Check stitching, webbing, cord, fabric and hardware for damage. On used gear, inspect the working parts rather than judging it by colour or how tidy it looks in the bag.
Do not use damaged suspension or unidentified hardware to support your body weight. If its intended use or condition is uncertain, resolve that before the trip.
Site and hammock suspension
The hammock position determines where the tarp needs to sit. Establish a safe hang first, then arrange the rain cover around it. In rain, you can put up a temporary tarp cover first and make the final adjustments once the hammock is underneath.
- Inspect both trees. Look at the trunks, roots and branches overhead. Reject loose ground, obvious decay, dead trees and damaged limbs. Use another site if you cannot assess the anchors confidently.
- Fit the tree straps. Follow the suspension instructions and keep the straps flat against the bark. Use appropriate tree-friendly straps rather than thin cord around the trunks.
- Attach the hammock suspension. Use the attachment method intended for your model. Keep tarp cord and insect-net elastics out of the load-bearing connection.
- Set a low, comfortable hang. A suspension angle of about 30 degrees from horizontal is a common starting point for gathered-end hammocks, not a substitute for model instructions. Do not pull the hammock tight like a washing line.
- Load it gradually. Sit down slowly while keeping your feet on the ground, then settle into your sleeping position. Check that the suspension stays secure and the hammock remains clear of roots, stones and other obstacles.
Expected result: the hammock supports you securely at a practical entry height, with room above it for an independent tarp. You can sit down without jumping into the fabric.
If your hammock has an insect net, follow its own support instructions. Leave enough freedom for the hammock to settle under load without pulling the net or zip tight.
Tarp ridgeline and attachments
A separate tarp ridgeline lets you change the shelter height without altering the hammock hang. Here, the ridgeline means the cord supporting the tarp ridge; it is not a structural hammock ridgeline.
- Run the tarp ridgeline between the trees. Position it above the occupied hammock and any supported insect net. Keep it independent of the hammock's load-bearing attachments.
- Secure the ends. Use knots or cord hardware you understand and have practised. Follow the hardware instructions, and leave adjustments reachable from the ground.
- Arrange the tarp over the line. For a straightforward A-frame pitch, place the ridge along the hammock's length. Use the tarp's intended attachment points; do not tension unsupported fabric.
- Centre the coverage. Check the head and foot ends from outside the shelter. Adjust the tarp along the line so its cover extends beyond the occupied sleeping area at both ends.
- Set the ridge tension. Remove excessive slack without hauling hard enough to distort seams or attachment loops. Keep a gap between tarp fabric and the hammock or net underneath.
Expected result: the tarp ridge stays in position when you enter the hammock, and you can adjust tarp tension without changing the hammock suspension.
The useful distinction is what each line does. Tree straps and hammock suspension support the sleeper. The tarp ridgeline and guylines shape the roof. Insect-net supports hold lightweight netting away from your face.
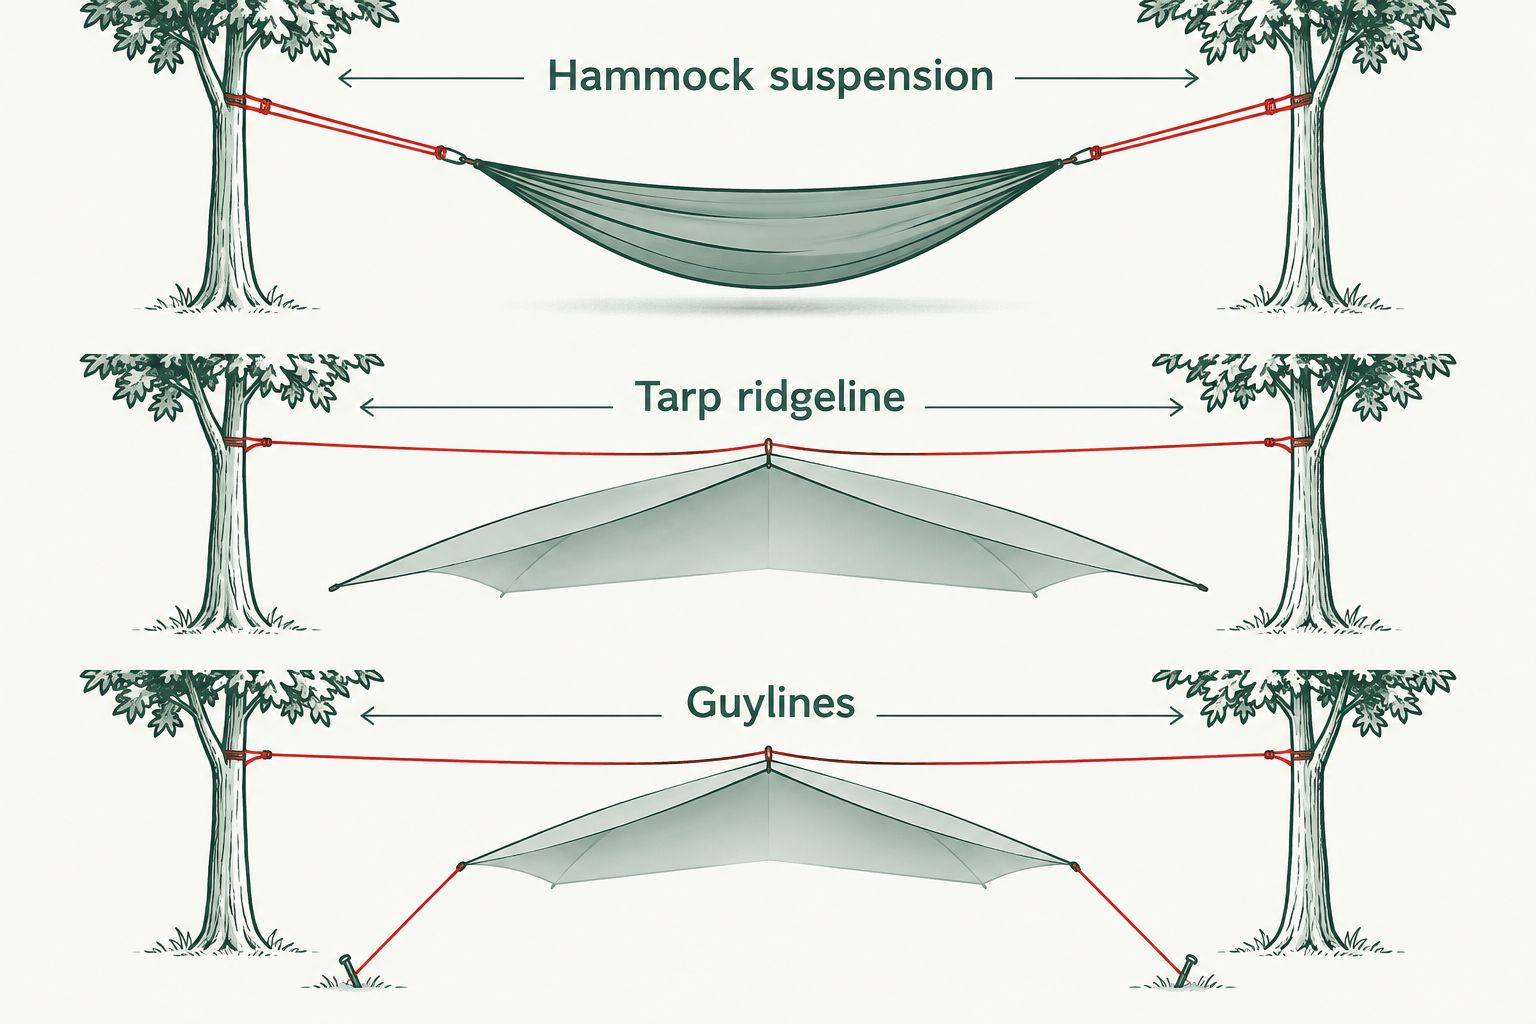
Guylines and weather coverage
An A-frame is the starting pitch for this workflow. It creates a roof over the hammock with sloping sides, but leaves the ends open. Position and coverage matter more than making the shelter look perfectly symmetrical.
- Attach the corner guylines. Start with 4 corner guylines on a rectangular tarp. Use additional designated attachment points where your tarp instructions and conditions require them.
- Spread the sides. Pull each corner outwards to form roof panels that shed water. Keep the occupied hammock beneath the covered area, including the position of your shoulders and feet.
- Set the pegs. Place them in firm ground with the pull acting against the peg's holding direction. Avoid roots, fragile vegetation and places where a guyline crosses a walking route.
- Balance the tension. Adjust opposite corners in turn. Remove folds that collect water, but do not stretch the tarp or force a poor pitch into shape.
- Check the weather-facing side. Lower the edge facing incoming wind and rain while keeping clearance around the hammock. Keep enough ventilation for damp air to escape.
- Check suspension runoff. Add a drip break outside the covered sleeping area where the suspension arrangement permits it. A short hanging cord can give travelling water a place to drip off; do not modify a safety-critical connection.
Expected result: water has a clear route off the roof, the pegs hold, and your occupied hammock stays clear of the tarp. Rain protection includes the ends, not just the middle.
For your 2026 pre-trip check, sit inside with your normal sleeping kit. Look along both ends and feel for fabric contact. A pitch that clears an empty hammock still needs this loaded check.
Loaded shelter check
Do the final check before committing to the night. Keep waterproof clothing accessible so you can adjust the shelter without unpacking your bedding in the rain.
- Enter carefully. Watch the guylines and settle into the sleeping position you actually use. Check overhead clearance and coverage at your head and feet.
- Inspect from outside. Leave the hammock and check for displaced pegs, slipping attachments or roof folds. Correct the fault rather than simply tightening every line.
- Check the sleep system. Position the underquilt or suitable mat according to its instructions. Keep bedding away from wet tarp edges and exposed suspension.
- Prepare the exit route. Put footwear and a light where you can reach them. Keep the route out of the hammock clear of loose cord and kit.
Expected result: the shelter remains stable after loading, your insulation stays positioned, and you can get out without stepping through a web of guylines.
Never cook inside the hammock or beneath low tarp fabric. Keep flames and hot equipment away from shelter material, suspension and bedding. If wind, damaged trees or deteriorating conditions make the site unsafe, relocate rather than trying to solve everything with more cord.
Lower the tarp when the weather changes
The adjacent workflow is a weather adjustment: keep the hammock hang unchanged and alter the independent tarp pitch. These are two configurations of the same shelter, not different hammock models.
| Tarp configuration | Best for | Practical advantage | Limitation |
|---|---|---|---|
| Open A-frame | Sheltered, settled conditions | Easier access and more airflow | Higher edges admit more wind-driven rain |
| Lower A-frame | Reducing exposure to wind-driven rain | Lower edges give more side cover | Less room and ventilation; the ends remain open |
Start with an A-frame, then adjust its exposure to the conditions. An open pitch is not the right choice simply because it feels spacious.
- Identify the incoming weather. Check what is happening at the shelter, not just what the forecast suggested.
- Lower the independent tarp ridge if needed. Keep sufficient clearance above the loaded hammock and insect net.
- Move the weather-facing corners lower. Reposition pegs so the panel remains sloped and taut rather than folded.
- Recheck the sleeping area. Confirm that your feet, head and insulation remain covered after the adjustment.
Practise both configurations before your 2026 trip. If the tarp cannot provide adequate coverage without touching your sleep system, choose a different shelter arrangement or a more protected permitted site.
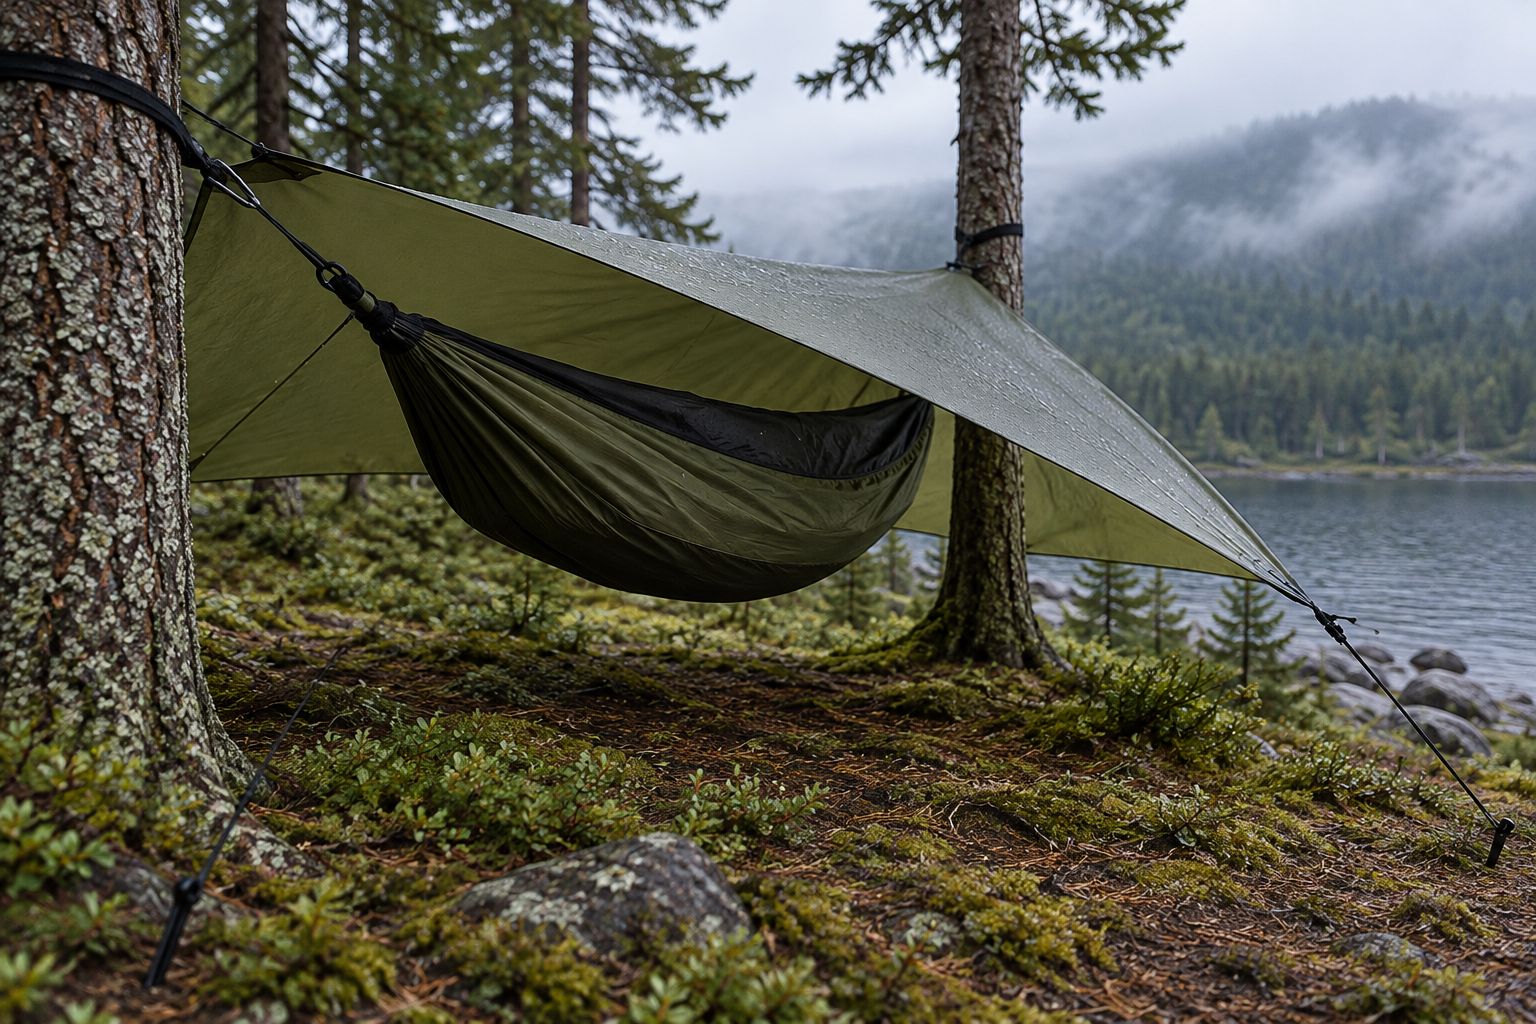
Troubleshooting
The tarp moves when you get into the hammock
Check for a shared line, clip or attachment that transfers hammock movement into the tarp. Separate the rigging and repeat the loaded check. Some movement through the trees is unavoidable; direct dependence on the hammock suspension is what this workflow removes.
Rain reaches the head or foot end
Check tarp position with the hammock occupied. Recentre the roof, lower the exposed edge and reassess the site's wind direction. If coverage remains inadequate, change the shelter or site rather than stretching the tarp harder.
Water follows the suspension into the hammock
Inspect the route from the tree towards the sleeping area. Position a suitable drip break outside the covered bed so water drops before reaching it. Test the arrangement; do not assume an accessory clip interrupts every water path.
The tarp sags or collects water
Inspect ridge tension, corner angles and slipping pegs. Reset the geometry and retension gradually, especially after rain. Tightening one corner hard can distort the opposite panel without removing the pocket.
You feel cold despite staying dry
Check the insulation beneath you. A tarp does not stop heat loss through compressed bedding, and gaps around an underquilt reduce its effectiveness. Adjust your insulation according to its instructions; do not close the roof down until it touches your sleeping kit.
Customise your workflow
Improve the repeatable setup before adding accessories. Pack the tarp where you can reach it first, keep cords organised, and rehearse the attachment method at home. Note which pitch works with your actual hammock and sleeping kit.
Military Mart's camping range includes genuine surplus gear, but surplus origin alone does not establish waterproof performance, insulation suitability or a safe suspension rating. Check the individual description and condition. Used and NOS kit still need inspection before a wild camp.
For alternative shelter arrangements, use the guide to pitching a military surplus tarp shelter. Keep a ground-based fallback separate from assumptions about what your hammock model permits.
FAQ
Do I attach a DD tarp directly to my hammock?
Use separate tarp rigging rather than attaching the weather cover to the hammock's load-bearing suspension. Both systems can use the same trees, but the tarp attachments must not support the sleeper.
What's the best starting pitch for a DD hammock tarp setup for wild camping?
An A-frame is a straightforward starting pitch for overhead hammock cover. Centre it over the occupied hammock and adjust the height and weather-facing edge to suit the conditions.
Can I use any tarp with a DD hammock?
A tarp needs suitable coverage and attachment points for the occupied hammock. Check the actual pairing at home rather than assuming that a brand name or square shape guarantees a fit.
How tight should I pull my hammock suspension?
Follow your hammock's suspension instructions rather than pulling it tight like a washing line. About 30 degrees from horizontal is a common starting angle for gathered-end hammocks, subject to the model's instructions.
Why does my hammock get wet underneath a tarp?
Rain can enter through exposed ends or travel along suspension, while condensation can wet nearby fabric. Check the loaded coverage, runoff routes and ventilation before blaming the tarp material.
Can I use tarp cord to hang the hammock?
Use suspension intended for your hammock and the expected load, not cord chosen for tarp rigging. Lightweight shelter attachments and insect-net supports are not body-weight suspension.
Does a tarp keep me warm in a hammock?
A tarp provides weather cover, not insulation underneath your body. Use appropriate hammock insulation and sleeping kit for the conditions, following their instructions.
What should I check when buying surplus camping kit from Military Mart?
Check the individual item's description, condition, sizing and intended use. Genuine surplus origin does not by itself establish compatibility with your DD hammock or suitability for supporting body weight.
One last thing
Judge the roof with the bed occupied. The useful check is not whether the empty hammock looks centred; it is whether your sleeping position stays covered and clear of wet fabric.
Keep that loaded check on your 2026 camp checklist. When choosing supporting kit from Military Mart, buy for its stated purpose and condition, then test the complete arrangement before heading out.


Leave a comment